Private CA with CFSSL
When hosting internal domains one mildly irritating thing is the browser warnings of “Not secure” and “Your connection is not private”. A quick remedy for this might be to issue a certificate from Let’s Encrypt with auto-renewal and call it a day.
In my opinion this is not the right solution for domains targeting an internal audience.
The whole foundation of Web Public Key Infrastructure (PKI) is built upon chains of trust:
I trust this certificate as it has been issued by a reputable authority that I know I can trust.
But for internal domains there is really no need to use a public issuer like Let’s Encrypt as the domains are accessed in a controlled environment. Also keep in mind that using a public CA for internal certificates will reveal more of your internal infrastructure, than what might be desirable, as details will be readily available on sites such as crt.sh.
A good alternative is to roll your own PKI with a private Root Certificate Authority. My go-to tool is CFSSL which is actively maintained by Cloudflare. To be more precise CFSSL is the umbrella name for an assortment of packages that assists with configuring and maintaining a PKI.
For this guide I will be using the CLI-tool cfssl and utility cfssljson which creates files from the JSON output of cfssl.
Table of contents
- Install cfssl & cfssljson
- Setup workdir structure
- Create the root CA
- Create the Intermediate CA
- Secure the root CA private key
- Issue our first certificate
- Test the certificate on a web server
- Verify
Install cfssl & cfssljson
- Start with downloading the pre-compiled binaries for
cfsslandcfssljson:
curl -SLO https://github.com/cloudflare/cfssl/releases/download/v1.5.0/cfssl_1.5.0_linux_amd64 \
&& curl -SLO https://github.com/cloudflare/cfssl/releases/download/v1.5.0/cfssljson_1.5.0_linux_amd64- Make the binaries executable:
chmod +x cfssl_1.5.0_linux_amd64 cfssljson_1.5.0_linux_amd64- And then make the binaries available on $PATH:
sudo mv cfssl_1.5.0_linux_amd64 /usr/local/bin/cfssl \
&& sudo mv cfssljson_1.5.0_linux_amd64 /usr/local/bin/cfssljson
Setup workdir structure
mkdir -p my-pki/root my-pki/intermediate my-pki/certificates && cd my-pkiCreate the root CA
The configuration for the root Certificate Authority is defined in file root-csr.json. Some of the attributes included here are:
- Common Name: What to call the root CA.
- Key algorithm and size: Here I use ECSDSA for the algorithm instead of RSA as it is more new and exciting and also has a smaller footprint where 256-bits equals RSA 2048-bits.
- Names: Additional attributes for country, locality and organization.
- Expiry: For a root CA you will probably want to have a long validity period to avoid rolling the whole PKI too often. Here I use 87 600 hours which roughly equals to 10 years.
- Create
root/root-csr.json:
cat << "EOF" > root/root-csr.json
{
  "CN": "Ekervhen Root Certificate Authority",
  "key": {
    "algo": "ecdsa",
    "size": 256
  },
  "names": [
    {
      "C": "SE",
      "L": "Stockholm",
      "O": "Ekervhen Internal"
    }
  ],
  "ca": {
    "expiry": "87600h"
  }
}
EOF- Generate the root CA with
cfssl:
cfssl gencert -initca root/root-csr.json \
| cfssljson -bare root/root-ca
The workdir structure so far:
my-pki
├── certificates
├── intermediate
└── root
    ├── root-ca.csr
    ├── root-ca-key.pem
    ├── root-ca.pem
    └── root-csr.json
Create the Intermediate CA
A good practice is to never issue certificates directly from the root CA. Instead intermediary CAs, issued by the root CA, should be used. This way you can manage different organizational units with their own intermediate CA and if this CA somehow gets compromised you do not need re-roll the whole PKI.
- Create
intermediate/intermediate-csr.json:
cat << "EOF" > intermediate/intermediate-csr.json
{
  "CN": "Ekervhen Intermediate CA",
  "key": {
    "algo": "ecdsa",
    "size": 256
  },
  "names": [
    {
      "C": "SE",
      "L": "Stockholm",
      "O": "Ekervhen Internal",
      "OU": "Ekervhen Internal Intermediate CA"
    }
  ]
}
EOF- Generate the private key and CSR for the intermediate CA:
cfssl genkey intermediate/intermediate-csr.json \
| cfssljson -bare intermediate/intermediate-ca- Before signing the intermediates certificate let’s configure a profile called
intermediatein fileconfig.json. Here some constraints will be specified:
- Usage:
cert signandcrl signdefines that the intermediate can only be used for issuing certificates, as well as revoking them. - Expiry: Again quite a long expiration period is set here at 70 080 hour or 8 years.
- CA Constraint:
is_ca=trueconfirms that the certificate will be used as a CA whilemax_path_len=1limits the intermediate to only be able to issue sub-intermediate CAs that does not have the capability to issue additional CAs. To disallow the intermediate CA to issue any child CAs at allmax_path_len":0and"max_path_len_zero": true}can be used.
- Create
config.json:
cat << "EOF" > config.json
{
  "signing": {
    "default": {
      "expiry": "8760h"
    },
    "profiles": {
      "intermediate": {
        "usages": ["cert sign", "crl sign"],
        "expiry": "70080h",
        "ca_constraint": {
          "is_ca": true,
          "max_path_len": 1
        }
      }
    }
  }
}
EOF- Sign intermediate with root CA
cfssl sign -ca root/root-ca.pem \
  -ca-key root/root-ca-key.pem \
  -config config.json \
  -profile intermediate \
  intermediate/intermediate-ca.csr \
| cfssljson -bare intermediate/intermediate-ca
Secure the root CA private key
Before we proceed with issuing our first certificate with the intermediate CA we should take some precaution and secure the root CA private key.
A common best practice is to store the private key on a device that is isolated from any networks and preferably only powered on when renewals are required.
First copy root/root-ca-key.pem somewhere safe and then proceed with removing it:
rm root/root-ca-key.pemIssue our first certificate
Before issuing the certificate we’ll update config.json with an additional profile called host which has some different usage attributes compared to the previously issued CAs.
For this profile typical web server certificates will be issued and with an expiry of 8 760 hours (1 year).
- Update
./config.json:
  {
    "signing": {
      "default": {
        "expiry": "8760h"
      },
      "profiles": {
        "intermediate": {
          "usages": ["cert sign", "crl sign"],
          "expiry": "70080h",
          "ca_constraint": {
            "is_ca": true,
            "max_path_len": 1
          }
+      },
+      "host": {
+        "usages": [
+          "signing",
+          "digital signing",
+          "key encipherment",
+          "server auth"
+        ],
+        "expiry": "8760h"
+      }
      }
    }
}- Specify the name, valid hosts and locality of the certificate in
certificates/my-webserver-csr.json:
cat << "EOF" > certificates/my-webserver-csr.json
{
  "CN": "my-webserver.internal.ekervhen.xyz",
  "hosts": ["my-webserver.internal.ekervhen.xyz", "192.168.1.20"],
  "names": [
    {
      "C": "SE",
      "L": "Stockholm",
      "O": "Ekervhen Internal",
      "OU": "Ekervhen Internal Hosts"
    }
  ]
}
EOF- Now the certificate can be issued via the intermediate CA, using the configured
hostprofile andcertificates/certificates/my-webserver-csr.json:
cfssl gencert \
  -ca intermediate/intermediate-ca.pem \
  -ca-key intermediate/intermediate-ca-key.pem \
  -config config.json \
  -profile host \
  certificates/my-webserver-csr.json \
| cfssljson -bare certificates/my-webserver- If every previous step has been successful the file structure should now look like this:
my-pki
├── certificates
│   ├── my-webserver.csr
│   ├── my-webserver-csr.json
│   ├── my-webserver-key.pem
│   └── my-webserver.pem
├── config.json
├── intermediate
│   ├── intermediate-ca.csr
│   ├── intermediate-ca-key.pem
│   ├── intermediate-ca.pem
│   └── intermediate-csr.json
└── root
    ├── root-ca.csr
    ├── root-ca.pem
└── root-csr.json- Optionally we can now check
certificates/my-webserver.pemwith openssl tool:
openssl x509 -in certificates/my-webserver.pem -text -nooutTest the certificate on a web server
To see the newly issued certificate in action a quick nginx web server deployment can be performed.
For HTTPS to work you want the server to provide the full chain of trust up to the root CA. Which means that the certificate needs to be bundled with all intermediate certificates.
- Make a full chain certificate with
cfssl:
cfssl bundle -ca-bundle root/root-ca.pem \
  -int-bundle intermediate/intermediate-ca.pem \
  -cert certificates/my-webserver.pem \
| cfssljson -bare my-webserver-fullchainNOTE: I had mixed results when running above command. On Debian 10 it would execute successfully but no fullchain certificate would be created.
Another way to generate a fullchain certificate is to run:
cat certificates/my-webserver.pem intermediate/intermediate-ca.pem \
certificates/my-webserver-fullchain.pem
- Now let’s create a simple nginx configuration with HTTPS enabled:
 cat << "EOF" > webserver.conf
 server {
     listen 443 ssl;
     server_name  my-webserver.internal.ekervhen.xyz;
     ssl_certificate /etc/nginx/certificates/my-webserver-fullchain.pem;
     ssl_certificate_key /etc/nginx/certificates/my-webserver-key.pem;

     location / {
         root   /usr/share/nginx/html;
         index  index.html index.htm;
     }
 }
EOF- And then start the web server with the following
dockercommand:
docker run --name my-webserver --rm \
  -v $PWD/certificates:/etc/nginx/certificates \
  -v $PWD/webserver.conf:/etc/nginx/conf.d/webserver.conf \
  -p 8443:443 nginx
To have the domain resolve to localhost you can modify your OS hosts file with entry 127.0.0.1 my-webserver.internal.ekervhen.xyz.
Verify
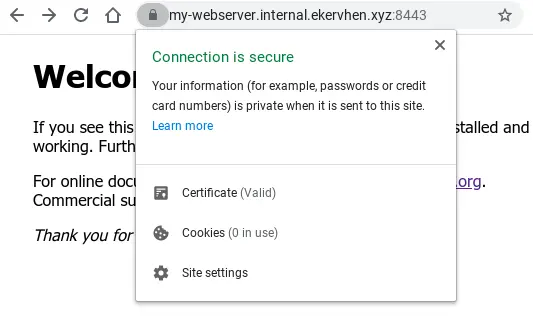
Now try accessing the domain on https://my-webserver.internal.ekervhen.xyz:8443.
Still getting warnings about this page not being secure and NET::ERR_CERT_AUTHORITY_INVALID? There’s one important piece of the puzzle missing:
- Import
root/root-ca.pemas a trusted Certificated Authority in your OS/browser! This needs to be done for every device that should trust certificates issued by the root CA and intermediaries.
Et voilà! The domain is now padlocked and secured: